Source Code Introduction
In order to get started quickly, you can go to our GitHub repository and view the complete code. This article will not contain everything from the project and is advised to go look into the code itself to get a full understanding. Starter Repository
It is expected to have an understanding of Kubernetes and a basic familiarity with Git and the Qwik framework. The project structure is outlined by the following screen shot.
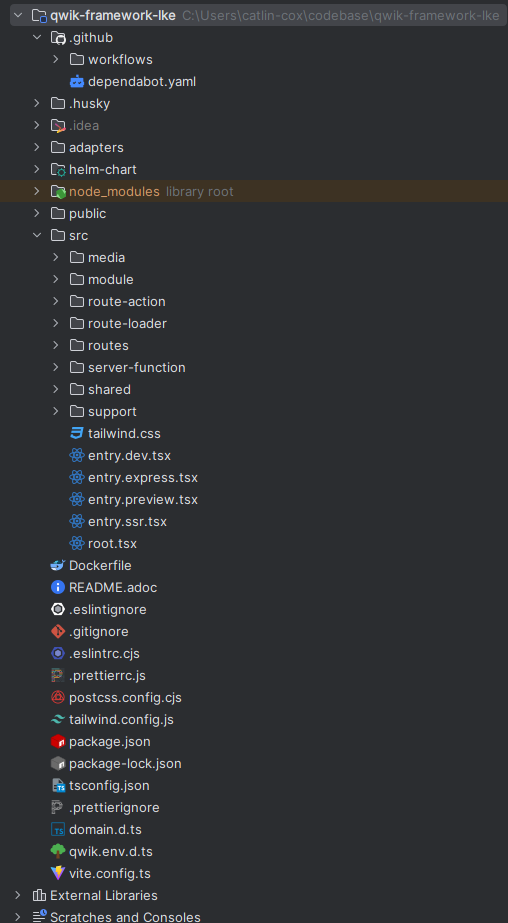
Let's go over the file structure and outline the purpose of each of the folders associated with the template. We will go from top to bottom of the project structure while explaining the purpose of each folder.
- .github - this folder contains all the workflow actions and dependabot configuration for the project.
- .husky - this folder contains all the hooks used by husky to perform code formatting along with test verification before allowing the code to be pushed to the remote repository.
- adapters - the adapter folder contains the associated code for the deployment adapter being used. Our projects use the express adapter, but more are available at the following. Qwik Deployment Adapters
- helm-chart - contains the definition of the Kubernetes manifest used and the templating values that are populated when executing the GitHub action workflow for deployment.
- public - contains all the public files, such as manifest, robots.txt and icons that are used by the project.
- src - this folder contains all the source code related to the project. You can see there are many other folders within the src folder.
- media - contains all the media that is not served by our content delivery system, this can include image, video, files, etc. Qwik optimized these images to be used as JSX for importing and optimization.
- module - contains all the separate module information, we use this as a way of sorting components on a per page or functionality basis. Example would be home-page containing a carousel only associated with the home page of the website.
- route-action - contains all the route actions that are used, primarily used for form management and form submission. Ultimately it is up to the developer to decide where to put global actions that are available everywhere. We export the actions from the specific layout or index page associated with the action in order to separate the action from the existing layout / index file.
- route-loader - similar to the route-action but is used to load the data for a specific route inside the application. These are exported as well from the specific route that is associated with the function.
- routes - contains all the actual available routes for the application. Here we define the layouts, pages, and paths that are available to the application.
- server-function - contains all the individual server functions defined, any component can call a server function and load data within the server environment to avoid leaking secure information to the client.
- shared - contains all the shared components, icons and other helpful utilities that are shared throughout many different paths, routes, components, etc.
- support - contains helpers for additional things, example would be a theme-tracker function that handles the changing of the theme server side by using an http cookie.
- tailwind.css - the standard stylesheet used to configure tailwind.
- entry.dev.tsx - the Vite dev server entry point for running the application locally.
- entry.express.tsx - the entry point for running the application in production with the express server adapter.
- entry.preview.tsx - the entry point for running the application in an optimized fashion locally.
- entry.ssr.tsx - the primary entry point used by every adapter and all optimizations are enabled.
- Dockerfile - contains the code to package the application as a docker container for the container registry.
I think the rest of the files are pretty self-explanatory, we won't cover all of the remaining ones, but if you have question feel free to post it to the GitHub repository.
The GitHub Workflows & Deployment
Let's cover the configuration for the GitHub workflows and then lean into how to structure Helm in order to take full advantage of the deployment actions. We will explain the different environment variables that are used inside the workflows to make the actions work correctly.
Dependabot Configuration
We use dependabot to automatically create pull request and check for vulnerable libraries or upgrade our dependencies while ensuring that the code is still be executed through the test phase before being allowed to merge from the dependabot branch. Below is our simple configuration that allows dependabot to take action on the repository.
version: 2
updates:
  - package-ecosystem: npm
    directory: "/"
    schedule:
      interval: daily
The configuration allows use to scan daily for updated packages that are currently used for the project. The benefit is that we have less overhead dealing with looking up updated packages manually or relying on always executing npm update --save.
Issue Auto Assign
We have an action that is associated with auto assigning an individual to pull request and issues. This action is very convenient when it comes to isolating assigning issues to a specific team or group within GitHub. It is also very simple to configure and executes nicely when things arise.
name: Issue Auto Assign
on:
  issues:
    types: ["opened"]
  pull_request:
    types: ["opened"]
jobs:
  run:
    runs-on: ubuntu-latest
    permissions:
      issues: write
      pull-requests: write
    steps:
      - name: "Auto Assign Issue"
        uses: pozil/auto-assign-issue@v1
        with:
          repo-token: ${{ secrets.GITHUB_TOKEN }}
          assignees: catlincox # this should be replaced with your own user.
          numOfAssignee: 1
Standard CI Testing Action
The below action is executed on every branch and pull request that is opened for the repository. We believe we should always have a testing suite associated with a repository, no matter the language that is being used.
name: Execute Overall Project Testing & Dependency Scanning
on:
  push:
    branches: ["*"]
    tags: ["[0-9]+.[0-9]+.[0-9]+"]
  pull_request:
    branches: ["*", "release/*"]
env:
  HUSKY: 0
jobs:
  execute_test:
    runs-on: ubuntu-latest
    permissions: write-all
    steps:
      - name: Checkout Repository
        uses: actions/checkout@v4
      - name: Configure Node Runtime
        uses: actions/setup-node@v4
        with:
          node-version: "20.12.2"
          cache: "npm"
      - name: Install Dependencies
        run: npm install
      - name: Run Unit Test
        run: npm run test
Auto Cleanup Workflow Execution
Often, we find ourselves having to many executed workflows being saved in the pipelines. The following action allows us to clean up the workflows for a project and keep the history clean and tidy.
name: Cleanup Old Workflow Executions
on:
  schedule:
    - cron: "0 0 * * *"
jobs:
  cleanup_workflow_executions:
    runs-on: ubuntu-latest
    permissions:
      actions: write
      contents: read
    steps:
      - name: Delete workflow executions
        uses: Mattraks/delete-workflow-runs@v2
        with:
          token: ${{ github.token }}
          repository: ${{ github.repository }}
          retain_days: 30
          keep_minimum_runs: 5
Actual Deployment Release Action
The following action is highly specific to how we currently do our deployments. It can be tweaked and changed to fit another need, but we will go over some of the actions that are associated with getting things to work with LKE. We will first show the full code then step through it a bit and explain each section.
name: Create Image & Deploy Platform with Helm
on:
  push:
    tags: ["[0-9]+.[0-9]+.[0-9]+"]

env:
  REGISTRY: ghcr.io
  IMAGE_NAME: ${{ github.repository }}
  NAMESPACE: qwik-framework-lke # replace with the actual name of the namespace.
  HELM_RELEASE_NAME: qwik-framework-lke # replace with the name of the helm chart for your application.
  HUSKY: 0

jobs:
  create_image_and_deploy_platform:
    runs-on: ubuntu-latest

    permissions:
      contents: read
      packages: write
      id-token: write
      actions: read
      attestations: write # remove this if you don't want to utilize attestation for docker image build.

    steps:
      - name: Checkout Repository
        uses: actions/checkout@v4

      - name: Container Registry Login
        uses: docker/login-action@v3
        with:
          registry: ${{ env.REGISTRY }}
          username: ${{ github.actor }}
          password: ${{ secrets.GITHUB_TOKEN }}

      - name: Extract Metadata (tags, labels) for Docker
        id: meta
        uses: docker/metadata-action@v5
        with:
          images: |
            ${{ env.REGISTRY }}/${{ env.IMAGE_NAME }}
          tags: |
            type=ref,event=branch
            type=ref,event=pr
            type=semver,pattern={{version}}
            type=semver,pattern={{major}}.{{minor}}

      - name: Build Docker Image & Push
        id: push
        uses: docker/build-push-action@v5
        with:
          context: .
          push: ${{ github.event_name != 'pull_request' }}
          tags: ${{ steps.meta.outputs.tags }}
          labels: ${{ steps.meta.outputs.labels }}

      - name: Generate Artifact Attestation
        id: attest
        uses: actions/attest-build-provenance@v1
        with:
          subject-name: ${{ env.REGISTRY }}/${{ env.IMAGE_NAME }}
          subject-digest: ${{ steps.push.outputs.digest }}
          push-to-registry: ${{ github.event_name != 'pull_request' }}

      - name: Setup Kubectl For Deployment
        uses: azure/setup-kubectl@v4

      - name: Setup Helm
        uses: azure/setup-helm@v3
        with:
          version: "latest"

      - name: Setup Access To Linode LKE
        uses: azure/k8s-set-context@v4
        with:
          kubeconfig: ${{ secrets.KUBECONFIG }}

      - name: Check For Namespace
        run: |
          if kubectl get namespace ${{ env.NAMESPACE }} &> /dev/null; then
            echo "Namespace '${{ env.NAMESPACE }}' already exists."
          else
            echo "Creating namespace '${{ env.NAMESPACE }}.'"
            kubectl create namespace ${{ env.NAMESPACE }}
            echo "Namespace '${{ env.NAMESPACE }}' was created successfully"
          fi

      - name: Create or Update Pull Secret
        uses: Azure/k8s-create-secret@v4
        with:
          namespace: ${{ env.NAMESPACE }}
          container-registry-url: ${{ env.REGISTRY }}
          container-registry-username: ${{ github.actor }}
          container-registry-password: ${{ secrets.GITHUB_TOKEN }}
          secret-name: regcred

      - name: Deploy Platform Application
        run: |
          helm upgrade --install --force ${{ env.HELM_RELEASE_NAME }} ./helm-chart \
            --namespace ${{ env.NAMESPACE }} \
            --create-namespace \
            --set image.repository=${{ env.REGISTRY }}/${{ env.IMAGE_NAME }} \
            --set image.tag=${{ github.ref_name }} \
            --set imagePullSecrets[0].name=regcred \
            --set example.variable=${{ secrets.RANDOM_SECRET }}

      - name: Verify Deployment
        run: |
          kubectl get pods -n ${{ env.NAMESPACE }}
          kubectl describe deployment ${{ env.HELM_RELEASE_NAME }} -n ${{ env.NAMESPACE }}
The above action is pretty involved, here is the actual flow of the action and a brief overview of each section.
- checkout repository - get the source code for the project.
- docker login - perform authentication with docker for the GitHub package registry.
- extract metadata - extract information from the docker build, this is tags, labels, and other attributes associated with the docker build.
- build docker image - execute the action to actually build the docker image and push to the container registry.
- attestation - this is specific to GitHub enterprise, but we verify image in this step ensuring that everything went accordingly.
- configure kubectl - configure the usage of the kubectl tool for managing Kubernetes.
- configure helm - configure helm to use the latest version.
- set k8-context - set the context that the kubectl should use, we use the azure set context action in order to load the kubeconfig from a secret associated with the company.
- ensure namespace exist - checks to ensure the namespace exists in the cluster and creates the namespace if it wasn't found.
- ensures updated pull-secret - automatically updates the pull secret for the image.
- execute helm update - actually deploys the application as helm chart, we set many different values that are overrides from the values.yaml for helm.
- verify deployment - check to ensure that the deployment went successfully, and the pods are initializing.
Well, that pretty much sums up the GitHub action side of things, we will briefly go over the structure of the Helm chart to sum things up.
Helm Chart Configuration
Here at Wolfi Solutions we have found that Helm makes it pretty simple to create deployments and group applications together. The templating itself isn't difficult but does take time to get familiar and before more adapt with customizations that can be performed.
Let's get started having a look.
The Chart.yaml
The chart.yaml is the main packaging structure for the helm chart. It is a rather simple configuration file, but has many things you can add to it in addition to what is currently shown.
apiVersion: v2
name: qwik-framework-lke
description: A helm chart that is a template for utilizing with Helm, LKE, GitHub Actions
type: application
version: 0.1.0
appVersion: "1.0.0"
The Values.yaml
The values.yaml stores the values that can be substituted into the templates. We can also set values like we did in the GitHub action in order to utilize secrets and not have anything exposed inside the repository.
image:
  repository: ghcr.io/wolfi-technology/qwik-framework-lke
  tag: latest
  pullPolicy: IfNotPresent

imagePullSecrets: []

replicaCount: 1

service:
  type: ClusterIP
  port: 80
  targetPort: 3000

ingress:
  enabled: true
  annotations:
    cert-manager.io/cluster-issuer: letsencrypt-prod
    ingress.kubernetes.io/force-ssl-redirect: "true"
    kubernetes.io/ingress.class: contour
    kubernetes.io/tls-acme: "true"
    projectcontour.io/response-timeout: "120s"
  tls:
    - secretName: qwik-framework-lke-tls
      hosts:
        - lke-example.wolfisolutions.tech
  hosts:
    - host: lke-example.wolfisolutions.tech
      paths:
        - path: /
          pathType: Prefix
          port: 80
certificate:
  enabled: true
  duration: "2160h"
  renewBefore: "360h"
  organizations:
    - "Wolfi Solutions LLC"
  dnsNames:
    - lke-example.wolfisolutions.tech
  issuerRef:
    name: letsencrypt-prod
    kind: ClusterIssuer
  secretName: qwik-framework-lke-tls

example:
  variable: "I am just a place holder as an example!!!"
The _helpers.tpl
The _helpers.tpl file contains simple helper functions that can be used to resolve values. If you are new to Helm, I would suggest looking deeper into the documentation to get an idea of what all can be done with helpers. The helper file helps us create readable names and versions for the chart and the application. You can view our current one below, note where you are seeing the qwik-framework-lke value can be replaced with your actual application name. That is what the helpers will look for when replacing values.
{{/*
Expand the name of the chart.
*/}}
{{- define "qwik-framework-lke.name" -}}
{{- default .Chart.Name .Values.nameOverride | trunc 63 | trimSuffix "-" }}
{{- end }}

{{/*
Create a default fully qualified app name.
We truncate at 63 chars because some Kubernetes name fields are limited to this (by the DNS naming spec).
If release name contains chart name it will be used as a full name.
*/}}
{{- define "qwik-framework-lke.fullname" -}}
{{- if .Values.fullnameOverride }}
{{- .Values.fullnameOverride | trunc 63 | trimSuffix "-" }}
{{- else }}
{{- $name := default .Chart.Name .Values.nameOverride }}
{{- if contains $name .Release.Name }}
{{- .Release.Name | trunc 63 | trimSuffix "-" }}
{{- else }}
{{- printf "%s-%s" .Release.Name $name | trunc 63 | trimSuffix "-" }}
{{- end }}
{{- end }}
{{- end }}

{{/*
Create chart name and version as used by the chart label.
*/}}
{{- define "qwik-framework-lke.chart" -}}
{{- printf "%s-%s" .Chart.Name .Chart.Version | replace "+" "_" | trunc 63 | trimSuffix "-" }}
{{- end }}

{{/*
Common labels
*/}}
{{- define "qwik-framework-lke.labels" -}}
helm.sh/chart: {{ include "qwik-framework-lke.chart" . }}
{{ include "qwik-framework-lke.selectorLabels" . }}
{{- if .Chart.AppVersion }}
app.kubernetes.io/version: {{ .Chart.AppVersion | quote }}
{{- end }}
app.kubernetes.io/managed-by: {{ .Release.Service }}
{{- end }}

{{/*
Selector labels
*/}}
{{- define "qwik-framework-lke.selectorLabels" -}}
app.kubernetes.io/name: {{ include "qwik-framework-lke.name" . }}
app.kubernetes.io/instance: {{ .Release.Name }}
{{- end }}
Time To Dive into Manifest
Getting started we will be having a look at the deployment.yaml manifest. It is rather simplistic and easy to understand what is going on with the content.
deployment.yaml
apiVersion: apps/v1
kind: Deployment
metadata:
  name: {{ include "qwik-framework-lke.fullname" . }}
  labels: {{- include "qwik-framework-lke.labels" . | nindent 4 }}
spec:
  replicas: {{ .Values.replicaCount }}
  selector:
    matchLabels: {{- include "qwik-framework-lke.selectorLabels" . | nindent 6 }}
  template:
    metadata:
      labels: {{- include "qwik-framework-lke.selectorLabels" . | nindent 8 }}
    spec:
      imagePullSecrets: {{- toYaml .Values.imagePullSecrets | nindent 8 }}
      containers:
        - name: {{ .Chart.Name }}
          image: "{{ .Values.image.repository }}:{{ .Values.image.tag }}"
          imagePullPolicy: {{ .Values.image.pullPolicy }}
          env:
            - name: EXAMPLE_ENVIRONMENT_VARIABLE
              value: {{ .Values.example.variable }}
service.yaml
apiVersion: v1
kind: Service
metadata:
  name: {{ include "qwik-framework-lke.fullname" . }}
  labels: {{- include "qwik-framework-lke.labels" . | nindent 4 }}
spec:
  type: {{ .Values.service.type }}
  ports:
    - port: {{ .Values.service.port }}
      targetPort: {{ .Values.service.targetPort }}
      protocol: TCP
      name: http
  selector: {{- include "qwik-framework-lke.selectorLabels" . | nindent 4 }}
ingress.yaml
apiVersion: networking.k8s.io/v1
kind: Ingress
metadata:
  name: {{ include "qwik-framework-lke.fullname" . }}-ingress
  annotations:
    {{- with .Values.ingress.annotations }}
    {{- toYaml . | nindent 4 }}
    {{- end }}
spec:
  {{- if .Values.ingress.tls }}
  tls:
    {{- range .Values.ingress.tls }}
    - hosts:
        {{- range .hosts }}
        - {{ . | quote }}
        {{- end }}
      secretName: {{ .secretName }}
    {{- end }}
  {{- end }}
  rules:
    {{- range .Values.ingress.hosts }}
    - host: {{ .host | quote }}
      http:
        paths:
          {{- range .paths }}
          - path: {{ .path }}
            pathType: {{ .pathType }}
            backend:
              service:
                name: {{ include "qwik-framework-lke.fullname" $ }}
                port:
                  number: {{ .port }}
          {{- end }}
    {{- end }}
certificate.yaml
Now with the certificate we utilize cert-manager in order to inject the certificate for the ingress. We currently use project contour as our ingress controller. The certificate might be specific to our use case but gives an idea of how to template the resource.
{{- if .Values.certificate.enabled -}}
apiVersion: cert-manager.io/v1
kind: Certificate
metadata:
  name: {{ include "qwik-framework-lke.fullname" . }}-tls
  labels:
    {{- include "qwik-framework-lke.labels" . | nindent 4 }}
spec:
  duration: {{ .Values.certificate.duration | quote }}
  renewBefore: {{ .Values.certificate.renewBefore | quote }}
  subject:
    organizations:
      {{- range .Values.certificate.organizations }}
      - {{ . | quote }}
      {{- end }}
  dnsNames:
    {{- range .Values.certificate.dnsNames }}
    - {{ . | quote }}
    {{- end }}
  issuerRef:
    name: {{ .Values.certificate.issuerRef.name }}
    kind: {{ .Values.certificate.issuerRef.kind }}
  secretName: {{ .Values.certificate.secretName }}
{{- end }}
Final Conclusion:
In summary GitHub has made it easier for us to deploy our services to the cluster. A simple time with deployment and modification is a must for feature / product delivery. If you stuck around this long, thank you for reading and if you want to join our newsletter use the form below. Once again, all this code can be found in the following repository.
Thanks for reading and keep on writing code :)